Funky Chicken Coop Tour Eve
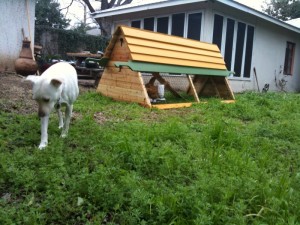
Tomorrow we’re participating in the 3rd annual Funky Chicken Coop Tour. Our coop and our ladies will be a stop on the tour (lucky number 13, if you’re looking on the official tour map). Come say “hi” if you’re in Austin!
Here’s a sneak peek of what we’ve got in store for you:
If you’re checking out this post after the tour – thanks for visiting! We’ll be posting more chicken related content in the next few days, including pictures from the tour and exclusive interviews with both Teriyaki and Dumpling about their tour experience.
In the meantime, you might be interested in some chicken info and resources.
The plans we used to make our coop are from Catawba Coops. The plans were well worth the $20 we paid for them – they include a very detailed shopping list for all the lumber and hardware we needed as well as really detailed cut lists (two things that other plans we looked at lacked).
Our hens are Buff Orpingtons. Â Friends of ours from Green Pocket Farm in Red Rock raised the ladies from chicks. We got them as young hens, or pullets, a month or two before they were laying their first eggs. Of the mixed bag of chicks that our friends raised, the buffs were the most friendly with humans and the most bossy with the other birds.
Now, we joke that Dumpling and Teriyaki are the “two-headed-chicken” because they’re often right next to each other doing the exact same thing. Some times, when one of the girls is upstairs laying, the other hen will wait downstairs and squawk out of, what appears to be, loneliness. Yes, it’s annoying, but it’s also kinda sweet.
We get most of our supplies and food from Buck Moore Feed. It’s a great local store with knowledgeable and friendly staff. If you’re in Austin and looking for chicken resources, go there! They’re also selling chicks now – they had lots of buff-orp chicks today, as well as some Black Australorps, Dominiques, and Rhode Island Reds.
If you’re looking for an even more incredible chicken field trip, make plans to visit H&H Poultry in Burnet. They have beautiful and unique chickens and an amazing flock of guineas. Guineas are super cool and prehistoric looking – it’s like visiting Jurassic Park!
The BackYard Chickens website has most of the info any person would want about raising a small backyard flock of hens.
Leave a comment if you have any specific chicken related questions and we’ll answer them in an upcoming post.
Spring has Sprung: 2011 Edition
It’s been a busy spring for us. I had an epic Spring Break extravaganza in which I flew to San Francisco to complete some bridesmaid duties for my friend Jeanine then flew to DC to be in my friend Kristin’s wedding. I did a bunch of DIY stuff for Kristin’s wedding, and once the pictures are processed, I’ll get those up in a post.
Until then, I just wanted to share some pictures of a few recent random projects.
We got our spring garden in back in early March. We’re growing tomatoes, herbs, beans and peas, melons, greens, radishes, carrots, and some other things I’m forgetting right now. So far, the garden is growing great – we haven’t got much rain this spring, but our garden is on an automatic drip irrigation system. I wanted to share this cool picture of a volunteer tomato plant (one of many) that I found in our garden:
 This winter, we had a Sun Gold Cherry Tomato plant that grew up from a dropped fruit. Now, the fruit that dropped from that plant is sprouting all over the garden bed. I went to pull out a few rouge sprouts and found this neat little science project under the ground.
 After we put in the garden, I got inspired to revamp some planters that were on our front steps since we moved into the house. I painted our “logo” on ‘em – a tall, orange carrot representing Bug, and a round, red beet representing me. Then I found some great lilies that matched the images perfectly. Fun!
And one final piece of eye candy for you to feast on – Texas Shortcake with berries and whipped cream. Every good Texan needs a Texas shaped cookie cutter.
It’s Been A Long Time: DIY In Absentia
Okay, now I’m one of those bloggers who’s apologizing for not posting anything for weeks and weeks. In mid July, I was asked to take on a much more time consuming position at my “real” job. It was a great opportunity, but didn’t exactly provide me with ample spare time to keep this blog updated. Starting in September, all of our spare time went in to preparing for the East Austin Studio Tour. Then of course, we were swept up in the fever that afflicts all do-it-yourselfers around the Holidays and spent countless hours working on making gifts for many awesome people.
The funny thing is, though we’ve been lazy bloggers, we’ve been incredibly active do-it-yourselfers. We’re already on to the next big projects (more on that soon), but I did want to share with y’all some of the great things we’ve made recently.
I drew an owl and a chicken and we screenprinted a bunch of tea-towels for gifts for various people.
I made a bunch of Bird Wreaths last year, but had some materials left over and made a few more for this holiday season.
I also helped our friends make gifts – our 4 and 5 year old buddies drew some art, including the allosaurus pictured above, and I turned them into screens. Then we printed tea towels and t-shirts.
I made a few bicycle tool rolls by screenprinting canvas, then sewing some pockets for wrenches, tire-irons, patch kits, etc. The whole kit rolls up into a handy little case:
Some other gifts we made but didn’t document as well were: screenprinted hoodies, screenprinted cards, beaded stitch markers for knitting, iPhone gloves (with conductive thread in the fingertips so you can answer your phone without taking your gloves off, and a screenprinted silk tie for my dad.
East Austin Studio Tour: EAST2010
Hi Folks!
Bug here with a quick update letting you know that we are so excited and proud to be participating in this year’s East Austin Studio Tour!
For those of you who aren’t familiar with the East Austin Studio Tour, it’s an event where hundreds of artists who have workspaces on the East Side of town open their studios to the public. It’s free to come check out any of the 150 participating studios. Some artists will be doing demos, some will be selling their work (everything from jewelry, to painting, to fabric art, printmaking, woodworking, and lots more!).
We’ve been huge fans of the tour in past years, and its a big part of our inspiration in building our own studio.
Our recent focus over the past few months has been to transmogrify our backyard garage into a Screen-Printing studio. We’ve re-plumbed, re-wired, demolished and constructed, and I think it looks pretty good. We have two presses, and the ability to coat, develop, and reclaim screens.
And we want to teach all y’all how to do it!
Our studio (and other participating EAST studios) will be open on Saturday and Sunday, November 13th and 14th from 11am to 6pm and again next weekend on Saturday and Sunday, November 20th and 21st from 11am to 6pm. We are #134 in the catalog. The address is 1713 E. 38th Street. (map)
It’s a little out of the beaten path (further North than the bulk of the participating studios), but please do drop by! We can point you in the direction of other (in many ways much cooler) studios.
Bring a blank shirt (or other cloth-like item) to print on, if you’d like!
Tutorial: Make a Watermelon Whale!
Summer is definitely here and fresh, cold watermelon is a favorite summer indulgence over here at ATX DIY Headquarters. These long, hot days remind me of growing up in California’s Central Valley (although the humidity of Central Texas is something that I’m still becoming accustomed to). My favorite way to serve watermelon is to make a watermelon whale. For me, it’s always a nostalgic project – my mom made watermelon whales for summertime family gatherings. It’s a tradition that I’m happy to carry on and share with y’all.
Making a watermelon whale is no more difficult than carving a pumpkin. Follow these simple steps to make your summer a little sweeter:
1. At the store, select a watermelon that is vaguely whale shaped (oval) and one that rests well on one side.
2. Materials and Tools:
You will need:
- A watermelon
- A big cutting board
- A large bowl
- A sharp, medium sized knife
- A spoon
- A dry erase marker (preferably green)
- A couple towels (that you don’t mind getting watermelon juice on)
- A colander
- A few toothpicks
- 1 sprig of mint
- 2 blueberries
Tutorial: Sew a Simple Circuit
One of my most recent crafty endeavors has been exploring the wild world of soft circuitry. It’s been a fun fusion of two things I love, crafts and science. While the craft part is pretty straight forward, the science end of things has been more of a challenge. Before working with sewable circuits, I knew very little about electricity – sure, I’d connected circuits before, made a lemon battery, and had a general layman’s understanding of electrons, but I’ve learned a whole lot more working on a few basic projects. The little I’ve learned about how electricity works was also helpful when Bug and I rewired the studio – we replaced existing wiring, hooked up new outlet boxes, and worked with conduit – it was easier than I expected!
In the interest of getting on with an already lengthy tutorial, I’ll post more about soft circuits in a future post. For now, enjoy these instructions for how to sew a simple circuit bracelet (or Power Cuff if you’re selling boys on the idea!). Please let me know in the comment sections if there are any instructions that are confusing (or flat out wrong!).
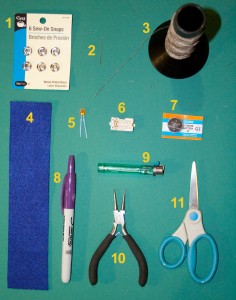
Materials and Tools
1. Sew-On Snaps- Make sure they are metal and not coated with paint, they need to conduct electricity. Magnetic snaps would also work – Available at craft stores or here.
2. Needle – Needs to have a relatively small head – Available at craft stores.
3. Conductive Thread – I’ve been using the 4ply conductive thread- Available at SparkFun.
4. Strip of Felt – Feel free to use another sewable, no-conductive material or fabric. Felt is easy because it doesn’t fray and is easy to stitch into – Available at craft stores.
5. LED – Most kinds should work, make sure they don’t need more than 3volts of power. I like to use the flat, rectangular LEDs for this project because they don’t stick out too much – Available here or in larger quantities here.
6. Surface Mount Battery Holder – Order this part from SparkFun, not all surface mount battery holders are sewable, this one is! – Available at SparkFun
7. Battery – CR2032 Lithium 3Volt Battery – Available where ever batteries are sold (I’ve seen ‘em cheap at IKEA and you can order them here).
8. Sharpie – Preferably a colored one.
9. Lighter – Optional, for burning ends of thread, I suppose a match would also work.
10. Round Nose Pliers – Typically a jewelry tool, small needle nose pliers would also work – Available at bead stores, most craft stores, or here.
11. Scissors – for clipping thread
Optional Materials:
Needle Threader – The conductive thread can be tricky to get through a needle and a needle threader is particularly useful for kids – Available at craft stores or here.
Electrical Tape – To tape the battery in place, especially in light of this scary article about kids swallowing these batteries – Available at any hardware store, most grocery stores, and some craft stores.
Alligator Clip Cables – Great for testing the project along the way. If you follow these steps exactly, you shouldn’t have anything go wrong, but it’s always nice to test that you’re wiring it up correctly before you sew it all together (trust me!). Also, if you’re planning to work with soft circuits in the future, you’ll definitely need a few sets of cables. – Available at Radio Shack and here.
Recipe: Cucumber Cups
Every other week, we get a box full of veggies from Johnson’s Backyard Garden, an organic farm only a few miles away from our house. We’re CSA subscribers and have been for a few years now. CSA stands for Community Supported Agriculture and is an increasingly common arrangement between farmers and consumers who want fresh, local food. By becoming a CSA member, we pay in advance for a quarter’s worth of veggie boxes. Our membership goes to support the farm, and insures that the farmer has sales (and income) regardless of growing season conditions. Our box is always packed full of awesome produce and we’ve decided to keep up with our membership even though we grow some of our own food at home.
Today, Johnson’s posted a recipe challenge on their FaceBook page, asking for everyone’s favorite cucumber recipes. I immediately thought about the Cucumber Cup, an ingenious restructuring of the gherkin that is endlessly adaptable. Using a cuke from our most recent box, I set to work.
How to make Cucumber Cups
Cucumbers are so refreshing and surprisingly good in drinks (think of the ice water with lemon and cucumber slices available at many spas). Cukes can be cut and emptied out to make cups that hold drinks. Cucumber cups are also great containers for various hors d’oeuvres and salads. Here’s how to carve a cucumber cup:
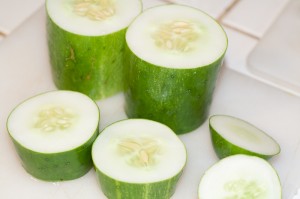
Pick a fairly large cucumber that is relatively straight. Cut the ends off of the cuke. For drink cups, slice segments that are approximately three inches long, for cups that will hold food, cut pieces that are about an inch long.
Now, to make cups that will hold liquids, take the taller cucumbers and slice a thin piece of the skin off the edges. Do this on all sides, forming a tall rectangular cube (check out the picture!).
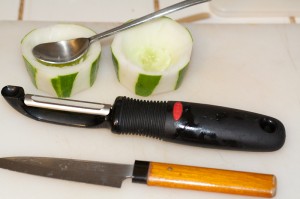
Scoop out the seeds and inside flesh with a paring knife and small spoon. Leave a good amount of flesh at the bottom (about a 1/2 inch), as you’ll want the cups to hold liquid without leaking.
Do basically the same thing for the shorter food cups. You can make ‘em rectangular by slicing off the sides, leave them fully skinned, or peel them into stripes (see the picture). I chose to make stripes with a peeler, alternating peeled section and stripes of skin. Hollow out the seeds and flesh leaving a thin layer of cucumber on the bottom.
Now you’re ready to fill your cucumber cups with delicious and refreshing goodness.
Continue reading this post after the jump for cucumber drink concoctions and a recipe for Cucumber Jalapeno Potato Salad.
Garden Eye Candy: Charlotte’s Web and Companion Planting Guide
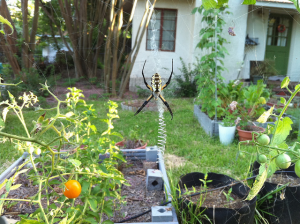 This lovely yellow garden spider has taken up residency in our garden. That zig-zag pattern in her web is her stabilimentum, which sounds a lot like a Harry Potter spell if you say it forcefully while holding a wand. We named her Charlotte and have been happy to host her especially since she’ll likely catch some nasty garden pests in her web.
It’s been hot here in Austin, but not nearly as bad as last year’s record-breaking brutal summer. We also learned some lessons from a few seasons of growing and now have almost all of our plants on a drip irrigation system that we run every other day early in the morning. So far the Sun Gold Cherry Tomatoes have been the most bountiful summer providers. We’ve also been able to harvest beans (pole and bush), herbs, carrots, and the last of our fall rainbow chard. Our squash and zucchini are coming along. There are a handful of peppers on our pepper plants. The hot days and mosquito-filled evenings make it difficult to find time to work on the garden – luckily our raised beds and irrigation system mean reduced time weeding and watering. It’s always worth braving the heat and getting a few bites for the reward of a quick harvest.
A while ago, I wrote up a Companion Planting Chart (click on the link to be taken to the document). Companion planting is essentially a practice of planting specific crops adjacent to (or far away from) each other based on the principal that some plants assist others by repelling pests, providing nutrients, attracting beneficial insects, etc. I was frustrated that there didn’t seem to be a comprehensive list of companion planting information, so I sat down and compiled a list from various sources. Although this list is far from entirely comprehensive, I hope it’ll be a useful resource to gardeners. Also, be advised that I’m by no means an expert in companion planting, just someone who spent some time doing research – there’s a good chance that some of the info on the chart is incorrect, and I know it’s far from complete. If you come across any inconsistencies or information I’ve left out, please let me know. Thanks and happy planting!
P.S. I just wanted to post links to a couple more handy gardening resources…
Travis County Planting Calendar: If you’re in the Austin area, this is a great month by month guide to what can be planted when. Surprisingly, August is one of the months with the most crops you can plant, so get digging!
Carrots Love Tomatoes: The Companion Planting bible, available at BookPeople in Austin and probably at a local independent book store or public library near you… but don’t take my word for it!
Sweet Dreams of Alligators, Mushrooms, and Dragonflies
Another picture heavy post – this time featuring a few baby quilts I’ve made recently. Gift giving is one of my biggest motivations for making things. It’s a great way to make something personal and I’m very inspired to create the perfect thing for a friends. Recently, a handful of friends have had babies, and I’ve sewn a few quilts. Usually my default “Welcome to the world” gift, I have fun picking out brightly colored patterns of flannel to make unique baby blankets that are anything but pastel. So far I’ve stuck to simple square blocks with a solid back but maybe I’ll branch out to patterns someday.
I’ve been coveting this alligator flannel for a long time – I was happy to have an excuse to buy it and make it into a vibrant jungle quilt for a friend who recently had her second baby boy.
Here’s a wee-one all bundled up snug in her magic mushroom quilt. I really dig the psychedelic heart fabric that I found for the backing.
My most ambitious quilt so far, I made this dragonfly blanket for a coworker whose nursery is decorated with Japanese woodblock prints. I used a darning foot on the sewing machine and some of the skills learned from one of my craft gods, Kathie Sever of Ramonster and the Future Craft Collective. I took her Freehand Machine Embroidery class at Stitch Lab, and although I am not even close to being able to create work like she does, I did feel like I learned a great skill and a few handy tricks in the class.
Studio Eye Candy: Recent Progress
We’ve been busy, and as a result, we’ve been lazy bloggers. Regrettably, this post will be a brief update, as there’s just so much to do! Bug and I have spent the past few weekends (and many weeknights) working on the studio. We really wanted to get all the wiring done so that we could run the A/C (it’s in the mid-nineties everyday now). So, after wrestling with Romex, conduit, and countless little connectors, we finally got all of the outlets re-wired. Success! Then, when we went to plug in the A/C, we noticed that the fan was rubbing on its case and we (read: Bug) had to take the whole window unit out of the window, take the case off, and reattach the fan. Needless to say, I was frustrated. Ultimately it was nice that we didn’t have to buy a new A/C or pay to have someone come out to fix it. It works great now, and I’m coming to terms with the fact that much of the progress with an ambitious project like the studio marches on in the two steps forward, one step back fashion. So it goes.
I’m off to work on countless other things, but I’ll leave you with a few photos of recent developments in the ATX DIY Studio:
One of two new overhead lights – notice the ATX DIY Logo key chain made with Shrinky Dinks.
We put up the first section of pegboard and shelving. The white bar will be used for hanging t-shirts. The little flags will be used for looking cute.
Our new studio mascot: Monty, the Bull. A longtime companion of Bug’s that he acquired in Montana, reminding us all that if you Do It Yourself, you are no wimp!

